Import Costing - File - Post Costed
Use this option to post the import costing batch as costed if you have received the items with the supplier’s invoice. You can only use this option if you entered an Invoice Number on the Import Costing Header screen. You also have the option to print an Import Cost report and an Import Costing Backorder Report. (For more information about these reports, refer to "Import Costing - File - Print Report".)
|
|

|
Technical Tip
If you have partially released a batch, you cannot post the batch as costed. You must release the remaining items in the batch when they are received and then post the batch as uncosted. Refer to "Import Costing - File - Partial Release".
|
- Process the import costing batch to completion stage.
Refer to "Import Costing Overview" for the steps involved.
- Select FILE | POST COSTED.
If the total of the line items received does not equal the invoice total (i.e. the Balance Amount does not equal the Total Received), Micronet displays a warning asking you to confirm that you want to proceed.
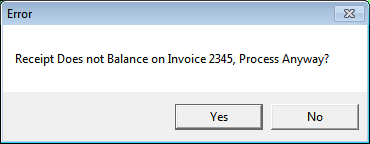
- Select No then investigate and correct the discrepancy before posting again.
Alternatively, you can select Yes to proceed.
|
|
|
Technical Tip
If an invoice number has not been entered for the batch and your user ID is set to prevent blank invoice numbers, Micronet displays a message that the invoice number has not been entered.
Select OK then display the Import Costing Header and enter the invoice number – refer to "Maintaining the Import Costing Header".
You can only leave the Invoice Number field blank if the Prevent Receipts Without Invoice field on the User File Update screen - MDS Security tab is set to No (refer to "Maintenance - Edit UserIDs - 1. Main").
|
|
|

|
Warning
If you entered import costing charges (see "Import Costing Header - Import Costing Charges") but you did not enter a supplier or invoice number, Micronet displays a message asking if you want to continue. Selecting to continue without entering the supplier or invoice number for the charges may cause variances between your Creditors Ledger and General Ledger.
|
If multi bins are enabled in your Micronet system and the ENTER DEFAULT RECEIPT BIN LOCATION option is selected on the Import Costing screen (refer to "Import Costing - Edit - Enter Default Receipt Bin Location"), Micronet displays the Enter Default Receipt Bin Location screen.

- Enter the temporary bin location that you want all the items in the batch received into, then select Ok.
You can also press spacebar then Enter to select a bin location. If you don't enter bin location, Micronet will post the items to their default bin locations.
Micronet processes the batch and displays the Select Report screen.
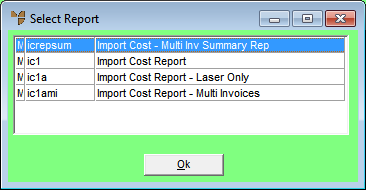
- Select a format for the Import Cost report then select Ok.
Micronet displays a User Defined Questions screen.

- Enter the heading you want displayed on your report (e.g. the batch name or number), then select Ok.
Micronet displays the Select Output Device screen.
- Select whether you want the report displayed on screen, printed, saved to a specific type of file, faxed, or emailed in a specific format.
When it has finished printing the Import Cost report, Micronet displays a message asking if you want to reprint the report.
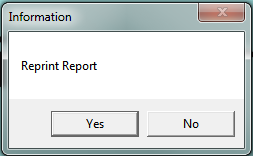
- Select Yes to reprint the report or No if you don't want to.
Micronet displays a message asking if you want to print the Import Backorder Report.
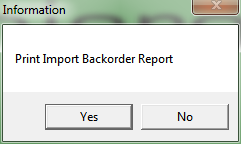
- Select Yes to print the report or No if you don't want to.
Micronet prints or displays the report (if selected).
